You might be asking yourself, "Who is Jet Jungle and why make miniature peanut butter for him?" Honestly, I knew this was a goofy project, but it got cooking in my brain, and I decided to share its development!
For those who do not know, Jet Jungle, "the fittest man alive," is a fictional adventurer created in South Africa during the 1970's. His main medium to fans was a broadcast radio show sponsored by South African products, Jungle Oats and Black Cat Peanut Butter! He was quite obscure, but came back into collector relevance when an extremely rare Mego version of the character was discovered to exist. (NOTE: I do not own the reference photos below. I just found them through various searches.)
 |
| Here is a photo of the Jet Jungle Mego 8 inch figure in his signature "jet black" outfit. Jungle Oats was one of the sponsors of the character. I have a custom 1/6 and a 1/18 Zica Toys Jet Jungle figure, but I do not own a Mego (vintage or repro) version of him. |
 |
| Here is another Jungle Oats ad showing illustrated depictions of the three main characters: Jet, Samantha Muller, and Prof. Giuseppe "Spaghetti" Valetti. More information on Jet's history can be found here. |
So why peanut butter? Well, Black Cat Peanut Butter was one of the original sponsors of Jet and was advertised throughout his adventures. Realizing that I had most of the necessary parts for this custom piece, I thought it would be cool to make a miniature version for my action figures to resort to in times of peril. I picture it as sort of like Jet's version of Popeye's spinach!
 |
| According to their website, "Black Cat is the proudly South African champion of peanut butter! It was first produced way back in 1926 under the name Alderton Limited, in Potgietersrus." After seeing this variety, I wanted to make jars for the original red and crunchy green lid versions! |
 |
| It was actually difficult to find small plastic containers with the appropriate lids. I avoid glass, because I do not want fragile parts among my toys. I found polypropylene makeup containers on eBay for a fair price. These were slightly oversized for action figures, but this quality will make them more eye-catching! Also, pardon the mess; I do resin projects in a shed well loved by ladybugs... |
 |
| I already had some resin left over from previous projects, so I broke this stuff back out. I bought it from Simple Resin; it is known as Aquaflex Clear Rubber Casting Resin. It is a 1:1 mix ratio and cures to a 80 Shore A hardness. This particular mix has a working time of 7 minutes and demold time of 4 hours. It's cures into a transparent plastic that is flexible and sturdy plastic, qualities I prioritize for toy parts! |
 |
| These were the two resin pigments I used to mimic the peanut butter color. Sometimes I need white to make the resin opaque, but the brown was strong enough without it. |
 |
| This is where the mixing magic occurs. The measuring cup is good for pouring. I typically would use a smaller cup if I was going to place the resin in my vacuum chamber to remove bubbles. The scale below the cup is needed for the mixing ratios of the resin parts. |
 |
| Here is how I applied the color pigment. Interestingly, you really do not need much for the color to spread. With some prior experimentation, I found out that a 3:1 orange to brown ratio of pigment makes a potent peanut butter color. |
 |
| I did not have time to photograph the mixing and pouring, because as soon as the two resin parts touch, the clock ticks down until the resin is too solid to work with. Above was what the resin combined to. I poured an equal amount of each bottle into the cup and just started stirring. When mixing, make sure to scrape the floor and walls of the cup well too. In hotter temperatures, the working time can be severely cut short. |
 |
| Here was the poured resin. There were some visible bubbles present, but for this particular project, I was not concerned about them. I sought a strongly cured state before handling these, so I refused to pick these up until morning. |
 |
| Here were the jars in the morning. I photographed them turned upside down to demonstrate their solidification. The resin can still be somewhat soft and not 100% cured, so avoid touching its surfaces. |
 |
| A small resin cleanup tip: wait until resin is cured before cleanup. Most of this leftover resin came out in one stretchy chunk when I pulled it from the measuring cup. This will save you much pain from nasty cleanup associated with liquid resin. |
 |
| The next part of this project was making jar labels. For the graphic editing, I used Google Slides, because it was free, and it did not lower image quality when resizing. I used a Black Cat Peanut Butter logo I found from some Googling, and applied it over some shapes. After some manipulation, testing, and printing, I finally came out with labels ideal for the size of my miniature jars! |
 |
| I had a paper cutter handy, so I used it for cutting out the labels. Do not be fooled; this still took me several attempts to get labels cut neatly! |
 |
| I was going to buy some higher-end liquid glue to apply the labels, but I ran into these "Industrial Strength" glue sticks in the Wal-Mart craft adhesives aisle. These lessened the chance of the labels potentially wrinkling from dabbles of liquid glue. |
 |
| Here are the finished jars of Black Cat Peanut Butter! They are durable and 100% functional! |
 |
| Here are the lids detached. The color is perfect! The bubbles are not ideal, but they are not going to be visible when the lids are on. |
 |
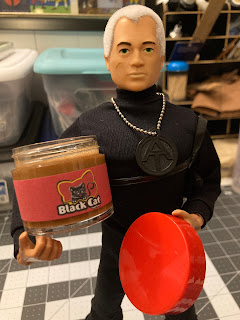
| Here is my 1/6 scale custom "G.I. Jet!" The jar is really more like a tub for G.I. Joe, but again, I am not concerned over the size for this accessory. |
 |
| The 1/18 official Jet Jungle is from Zica Toy's Comic Adventure Heroes line. I now have enough miniature Black Cat Peanut Butter to keep both of my Jets, "the fittest men alive!" |
The 1/6 Jet is a Timeless G.I. Joe that was partially balded and flocked by the talented Mick Coxey in England. I saved a green eyed figure for this custom to keep in theme with his last name being "Jungle." I patterned and sewed his bell bottoms to give his outfit a unique sleek shape, since his signature look is limited to only jet black. The rest of his parts are from various lots. I have plans to eventually put together a 1/6 Samantha and Professor Valetti.
This project involved a few disciplines, so I guess that is what really convinced me to execute it. I love action figure customizing, because if done well, it requires dabbling in all sorts of arts!
I hope you enjoyed this article on obscure heroes and peanut butter of South Africa! Stay tuned for more action figuring!
-Chuck


Comments
Post a Comment